


This guide delves into the fundamentals of using Telnet for SMTP testing. It offers a thorough walkthrough on setting it up across various operating systems and exploring alternative methods essential for network administrators.
Why Use Telnet for Email Testing?
Telnet emerges as a valuable tool if you’re exploring options for SMTP testing. Here’s a quick rundown on why it’s a solid choice:
- Direct server interaction: Telnet operates over TCP (Transmission Control Protocol), enabling direct communication with mail servers. This is crucial for diagnosing connection issues and troubleshooting other various SMTP-related problems.
- Manual command execution: Its interface allows for manually sending SMTP commands and receiving server responses. This hands-on approach offers deep insights into server behavior and ensures correct configuration.
- Authentication process testing: It plays a key role in testing SMTP authentication processes, which are vital for the security and integrity of email communication.
Setting up Telnet: Windows, Linux, Mac
Setting up Telnet varies across different operating systems. In this section, we’ll cover installing and configuring Telnet on Windows, Mac, and various Linux distributions.
***Note: Before installation, ensure your firewall permits Telnet connections to avoid any connectivity issues.
Installing Telnet on Windows
Windows users have different installation methods depending on their operating system version.
For Windows 8 and later:
Open the Command Prompt (cmd) with administrator privileges.
Type this command and press Enter:
dism /online /Enable-Feature /FeatureName:TelnetClient
***Note: The dism command requires elevated permissions.
For Windows 7, Windows Server 2008 R2, Windows Server 2008, or Windows Vista:
- Open the Command Prompt.
Type the following command and press enter.
pkgmgr /iu:"TelnetClient"
Using PowerShell (Applicable to Windows 8.1, Windows 10, Windows Server 2012 R2, or later):
Open PowerShell as an administrator.
Type the following command and press enter.
Enable-WindowsOptionalFeature -Online -FeatureName TelnetClient
Installing Telnet on Mac
Installing Telnet on a Mac involves using Homebrew, a popular package manager. If you don’t have it installed, follow the steps provided on the Homebrew Documentation.
Once you have Homebrew set up, open the Terminal and enter the following command:
brew install telnet
You will see output similar to the following, indicating the progress of the installation:
==> Fetching telnet
==> Downloading https://ghcr.io/v2/homebrew/core/telnet/manifests/64
######################################################################## 100.0%
==> Downloading https://ghcr.io/v2/homebrew/core/telnet/blobs/sha256:cf76f3b47cf35efd4d271adf52227e463298005ec9b1ac586b629d5ad94522cf
==> Downloading from https://pkg-containers.githubusercontent.com/ghcr1/blobs/sha256:cf76f3b47cf35efd4d271adf52227e463298005ec9b1ac586b629d5ad94522cf?se=2023-01-26T18%3A25%3A00Z&sig=YVwwx%2FEglPVEjx0gsrb6aN7O6e3D%2Fwk%2BPEMjjTRju7M%3D&sp=r&spr=h
######################################################################## 100.0%
==> Pouring telnet--64.arm64_monterey.bottle.tar.gz
 /opt/homebrew/Cellar/telnet/64: 4 files, 175.2KB
==> Running `brew cleanup telnet`...
Disable this behaviour by setting HOMEBREW_NO_INSTALL_CLEANUP.
Hide these hints with HOMEBREW_NO_ENV_HINTS (see `man brew`).
Installing Telnet on Linux
The installation of Telnet on Linux varies based on your distribution. For all distributions, you will be prompted to enter your administrator password. Type it in, press enter, and wait for the system to complete the installation before proceeding with further commands.
Common commands for popular distributions are entered in the Terminal as follows:
Arch Linux and Manjaro:
$ sudo pacman -S inetutils
Ubuntu, Kali Linux, Debian, and Linux Mint:
$ sudo apt install telnet
Red Hat, Fedora, and CentOS:
$ sudo dnf install telnet
How to Test SMTP with Telnet?
To initiate an SMTP connection with a server via Telnet, use a command specifying the server’s address (domain name or IP address) and the port it listens on. For instance:
telnet sandbox.smtp.mailtrap.io 2525
This command attempts to connect to the SMTP server at sandbox.smtp.mailtrap.io on port number 2525.
Once the connection is successfully established, you should see a response from the SMTP server. For the above command, the response might look like:
220 sandbox.smtp.mailtrap.io ESMTP server ready
This indicates that the server is ready to accept Telnet commands. From here, you can send SMTP commands to interact with the server, such as initiating an email transmission.
Sending an Email via Telnet
Sending an email through an SMTP server using Telnet involves a series of commands and interactions. This process can be invaluable for testing and verifying the server’s capability to handle email transmission. Below are the steps to email via Telnet:
1. First, connect with your SMTP server using Telnet:
telnet sandbox.smtp.mailtrap.io 2525
2. Second, introduce yourself using the EHLO (or HELO) command:.
EHLO example.com
**Note: The HELO command initiates a basic SMTP session. It does not support ESMTP extensions like STARTTLS, essential for upgrading to a secure connection using the TLS (Transport Layer Security) protocol. The server will list the supported SMTP extensions in the response, typically starting with 250.
For example, you may see:
250-sandbox.smtp.mailtrap.io
250-PIPELINING
250-SIZE 10485760
250-ETRN
250-STARTTLS
250-AUTH LOGIN PLAIN
250-ENHANCEDSTATUSCODES
250-8BITMIME
250 DSN
3. Set the email sender with the MAIL FROM command.
MAIL FROM: <sender@example.com>
4. Set the email recipient with the RCPT TO command.
RCPT TO: <recipient@example.com>
5. Compose the email starting with the DATA command, then the email content, and ending with a period (.) on a new line.
DATA
From: sender@example.com
To: recipient@example.com
Subject: Telnet email on

This is my first plain text test email message sent using the Telnet client on Windows
.
6. Lastly, terminate the session with the QUIT command.
Here is an example of a complete Telnet session for sending an email, including all the commands and the expected responses from the SMTP server after each command:
telnet sandbox.smtp.mailtrap.io 2525
220 sandbox.smtp.mailtrap.io ESMTP server ready
EHLO example.com
250-sandbox.smtp.mailtrap.io Hello
250-SIZE 37748736
250-PIPELINING
250-DSN
250-ENHANCEDSTATUSCODES
250-STARTTLS
250-X-ANONYMOUSTLS
250-AUTH NTLM
250-X-EXPS GSSAPI NTLM
250-8BITMIME
250-BINARYMIME
250-CHUNKING
250 XRDST
MAIL FROM: <sender@example.com>
250 2.1.0 Sender OK
RCPT TO: <recipient@example.com>
250 2.1.5 Recipient OK
DATA
354 Start mail input; end with <CRLF>.<CRLF>
From: sender@example.com
To: recipient@example.com
Subject: Telnet email

My first test message sent via the Telnet client on Microsoft's Windows
.
250 2.0.0 Ok: queued as ABC123456789
QUIT
221 2.0.0 Service closing transmission channel
Verifying the Email Delivery
Check Server Responses: The quickest and simplest way to verify delivery is by observing the responses from the SMTP server during the Telnet session. After you complete the email composition and send it, the server will respond to your email’s status.
Inspect Queue Confirmation: A typical positive response after sending an email via Telnet is an acknowledgment from the server that the email has been queued. For example:
250 2.0.0 Ok: queued as <the item id in the queue>
- Examine Server Logs: You can examine the SMTP server’s logs beyond the immediate session. These logs typically record the server’s action, including email receipt, processing steps, and final delivery.
Telnet SMTP Testing Limitations and Challenges
While Telnet has been a longstanding tool for SMTP testing, it presents several challenges, including the lack of automated testing capabilities and difficulty handling encrypted connections, such as those requiring SSL (Secure Sockets Layer) protocols.
These limitations point to the need for a more advanced and efficient solution. A solution like Mailtrap Email Testing is part of the comprehensive Mailtrap Email Delivery Platform, including Email Sending.
Mailtrap Email Testing acts as a secure email sandbox, allowing you to inspect and debug emails in staging, development, and QA environments before sending them to recipients. Some of its key features include:
A Fake SMTP Server to enable safe and isolated email testing.
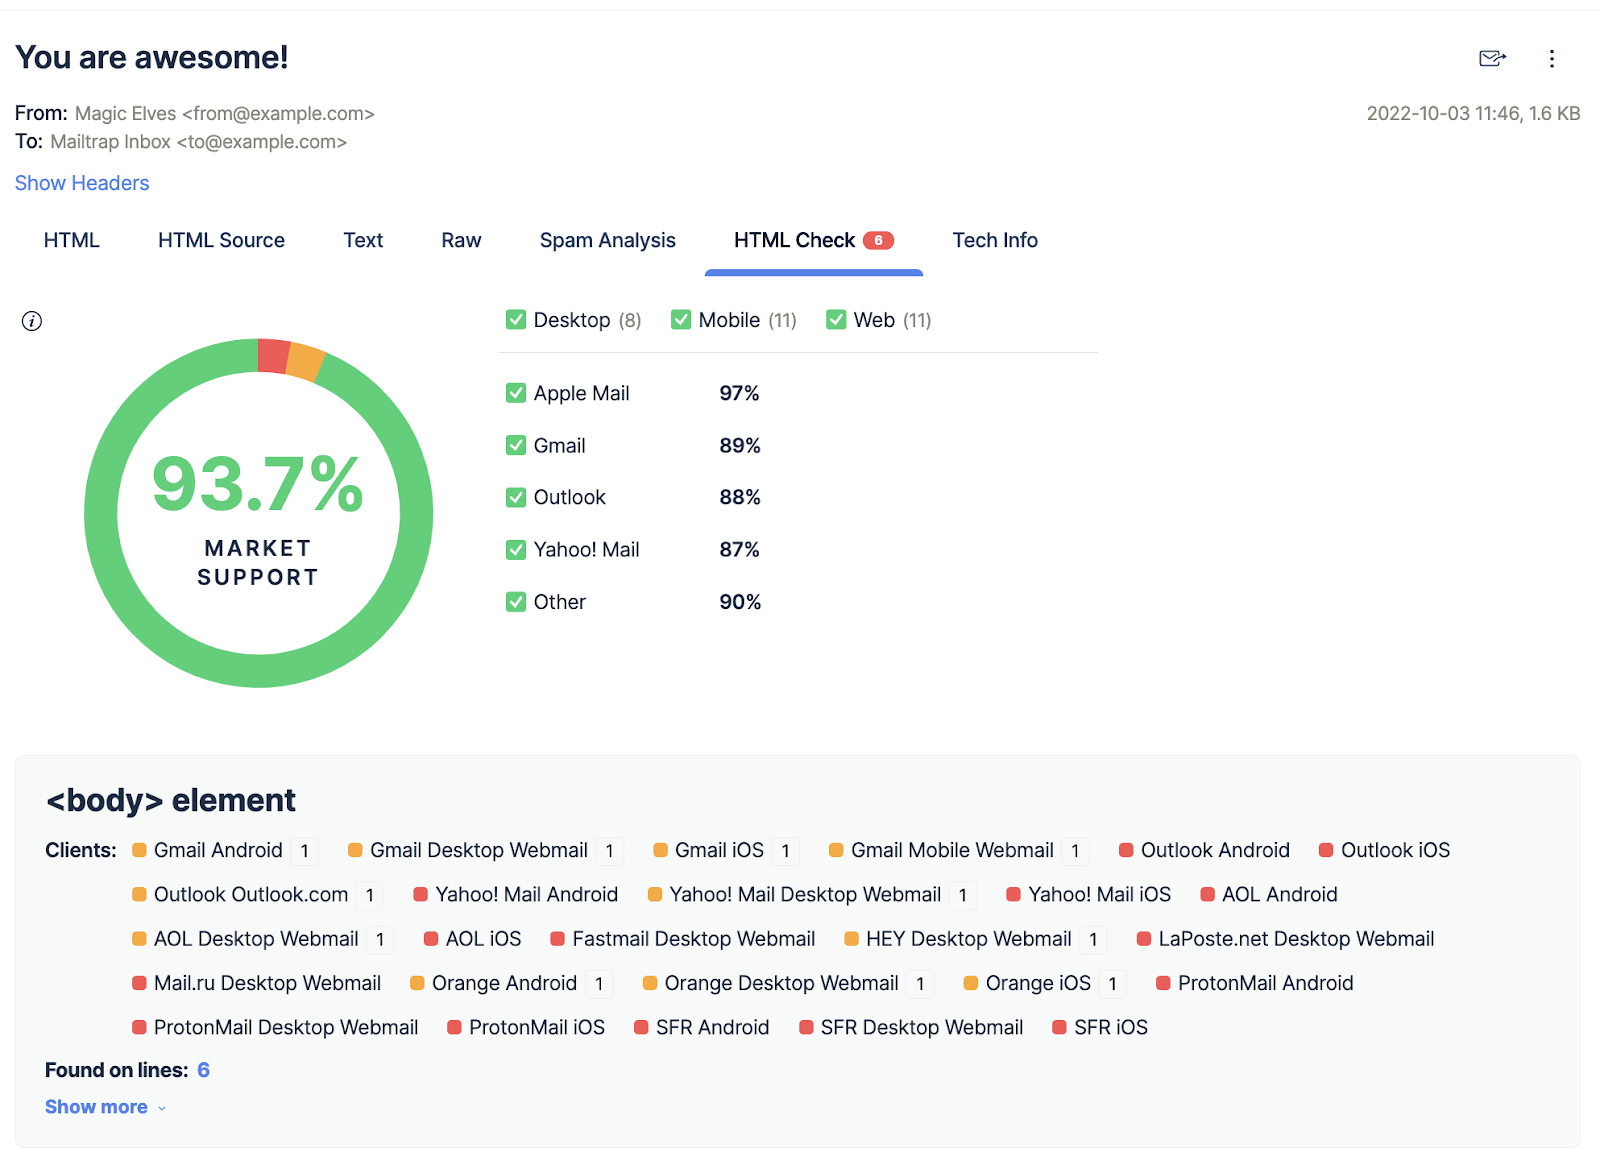
HTML/CSS Checker to ensure your emails look as intended.
Spam Score Analysis to lower the likelihood of emails being marked as spam.
Email Preview to see how your emails will look to the end-user across multiple devices.
Multiple Inboxes for managing different projects and stages.
Ready-to-use Integrations in more than 20 programming languages.
To get started with Email Testing, make sure to check out our detailed guide.
Thank you for exploring the ins and outs of SMTP testing with us in our comprehensive guide. To enhance your understanding and proficiency further, we invite you to check out Mailtrap's dedicated blog post on Telnet SMTP testing.